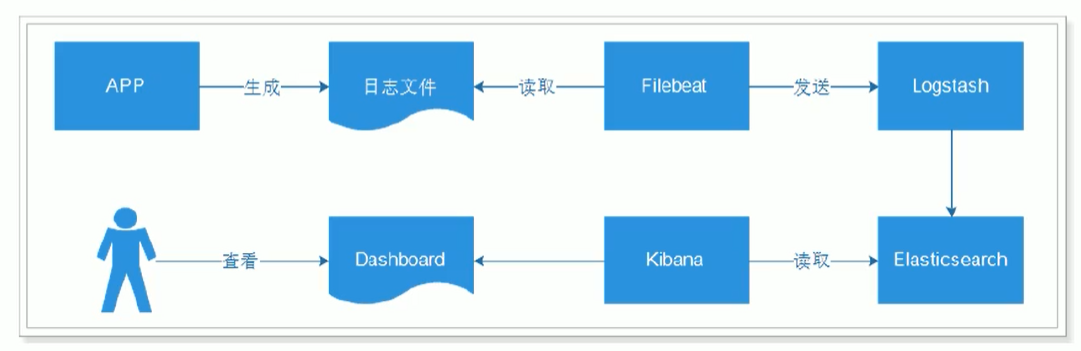
ELK是一款开源的海量日志搜索分析平台,能够完美的解决我们上述的问题,对日志进行集中采集和实时索引,提供实时搜索、分析、可视化、报警等功能,帮助企业在统一平台实时管理日志数据,进行线上业务实时监控、异常原因定位、数据统计分析。
Elasticsearch是实时全文搜索和分析引擎,提供搜集、分析、存储数据三大功能;是一套开放REST和JAVA API等结构提供高效搜索功能,可扩展的分布式系统;它构建于Apache Lucene搜索引擎库之上
Logstash是一个用来搜集、分析、过滤日志的工具。它支持几乎任何类型的日志,包括系统日志、错误日志和自定义应用程序日志。
Kibana是一个基于Web的图形界面,用于搜索、分析和可视化存储在 Elasticsearch指标中的日志数据。
Filebeat是一个轻量型日志采集器,用于转发和汇总日志与文件。
| 服务器信息 | 系统版本 | 组件信息 |
|---|---|---|
| 10.20.21.21 (Master) | Centos7.6 | Elasticsearch、Logstash、Kibana、Redis |
| 10.20.21.46 (Slave) | Centos7.6 | Elasticsearch、Logstash、Kibana、Redis |
| 10.20.21.33 | Windows2012 | Filebeat |
Elasticsearch配置文件路径/usr/local/src/tyuninstall/elasticsearch/config/elasticsearch.yml
Logstash的配置文件路径信息/usr/local/src/tyuninstall/logstash/conf.d/和/usr/local/src/tyuninstall/logstash/config/logstash.yml
Kibana配置文件路径/usr/local/src/tyuninstall/kibana/config/kibana.yml
Redis 配置文件路径信息/etc/redis/6379.conf
yum环境包安装
mv /etc/yum.repos.d/CentOS-Base.repo /etc/yum.repos.d/CentOS-Base.repo.backup
mv /etc/yum.repos.d/epel.repo /etc/yum.repos.d/epel.repo.bak
wget -O /etc/yum.repos.d/CentOS-Base.repo http://mirrors.aliyun.com/repo/Centos-7.repo
wget -O /etc/yum.repos.d/epel.repo http://mirrors.aliyun.com/repo/epel-7.repoyum install -y net-tools vim lrzsz tree screen lsof   wget chrony     telnet    gcc gcc-c++ tcl   iptables-services   nmap  sysstat dos2unix   bash-completion.noarch  curl ruby ruby-devel rubygems rpm-build  make jemalloc-devel    automake autoconf libtool   tcl binutils
glibc glibc-kernheaders glibc-common glibc-devel
防火墙
systemctl stop firewalld
systemctl disable firewalldiptables -L
iptables -F
iptables -Xvim /etc/sysconfig/iptables
-A INPUT -p tcp -m state --state NEW -m tcp --dport 22 -j ACCEPT
-A INPUT -p tcp -m state --state NEW -m tcp --dport 5601 -j ACCEPT
-A INPUT -p tcp -m state --state NEW -m tcp --dport 6379 -j ACCEPT
-A INPUT -p tcp -m state --state NEW -m tcp --dport 9200 -j ACCEPT
-A INPUT -p tcp -m state --state NEW -m tcp --dport 9300 -j ACCEPTsystemctl restart iptables.service
systemctl enable iptables.service
Selinux
setenforce 0 临时生效selinuxsed -i 's/^SELINUX=.*$/SELINUX=disabled/' /etc/selinux/config
主机名称
hostnamectl set-hostname  10-20-21-21
bash
zabbix监控
rpm -Uvh http://repo.zabbix.com/zabbix/4.0/rhel/7/x86_64/zabbix-release-4.0-2.el7.noarch.rpmvim /etc/yum.repos.d/zabbix.repo
[zabbix]
name=Zabbix Official Repository - $basearch
baseurl=https://mirrors.aliyun.com/zabbix/zabbix/4.0/rhel/7/$basearch/
enabled=1
gpgcheck=1
gpgkey=file:///etc/pki/rpm-gpg/RPM-GPG-KEY-ZABBIX-A14FE591[zabbix-non-supported]
name=Zabbix Official Repository non-supported - $basearch
baseurl=https://mirrors.aliyun.com/zabbix/non-supported/rhel/7/$basearch/
enabled=1
gpgkey=file:///etc/pki/rpm-gpg/RPM-GPG-KEY-ZABBIX
gpgcheck=1yum install -y zabbix-agent
service zabbix-agent restart
systemctl enable zabbix-agent
环境变量
JAVA下载 https://www.oracle.com/java/technologies/javase/javase-jdk8-downloads.html#license-lightboxtar zxf jdk-8u261-linux-x64.tar.gz -C /usr/local/src/tyuninstall/cd /usr/local/src/tyuninstall/mv jdk1.8.0_261/ jdk
vim /etc/profileexport PATH USER LOGNAME MAIL HOSTNAME HISTSIZE HISTCONTROL #第53行下面添加
export JAVA_HOME=/usr/local/src/tyuninstall/jdk
export CLASSPATH=.:$JAVA_HOME/jre/lib/rt.jar:$JAVA_HOME/lib/dt.jar:$JAVA_HOME/lib/tools.jar
export PATH=$PATH:$JAVA_HOME/binsource  /etc/profilejava -version  版本查看   java version "1.8.0_261"
时间同步
systemctl start chronyd && systemctl enable chronyd
timedatectl set-timezone Asia/Shanghai && timedatectl set-ntp yes
hosts文件修改
echo "10.20.21.21 10-20-21-21">> /etc/hosts
echo "10.20.21.46 10-20-21-46">> /etc/hosts
内核配置
vim /etc/sysctl.conf
net.ipv6.conf.all.disable_ipv6 = 1
net.ipv6.conf.default.disable_ipv6 = 1
vm.max_map_count = 655360
net.core.somaxconn=65535
net.ipv4.ip_forward = 1
fs.file-max=1645037
vm.swappiness=1sysctl -p
文件限制
vim /etc/security/limits.conf
* soft nofile 65536
* hard nofile 65536
* soft nproc 65536
* hard nproc 65536
* soft memlock unlimited
* hard memlock unlimitedegrep -v "^$|#" /etc/security/limits.confulimit -SHn  65536
ulimit -a
vim /etc/security/limits.d/20-nproc.conf
*          soft    nproc     4096
软件目录与软件官网地址
软件下载目录`/usr/local/src/tiopspage/`
软件安装目录 `/usr/local/src/tyuninstall/`
mkdir -p  /usr/local/src/{tiopspage,tyuninstall}
官方下载地址 https://www.elastic.co/cn/downloads/
Elasticsearch 6.8.12 https://artifacts.elastic.co/downloads/elasticsearch/elasticsearch-6.8.12.tar.gz
Logstash6.8.12 https://artifacts.elastic.co/downloads/logstash/logstash-6.8.12.tar.gz
Kibana6.8.12 https://artifacts.elastic.co/downloads/kibana/kibana-6.8.12-linux-x86_64.tar.gz
Filebeat6.8.12 https://artifacts.elastic.co/downloads/beats/filebeat/filebeat-6.8.12-windows-x86_64.zip
Redis5.0.9 http://download.redis.io/releases/redis-5.0.9.tar.gz
Redis
tar -zxvf /usr/local/software/redis-5.0.9.tar.gz  -C /usr/local/src/tyuninstall/
cd /usr/local/src/tyuninstall/
mv  redis-5.0.9/  redis
cd /usr/local/src/tyuninstall/redis
make  && make install PREFIX=/etc/rediscp /usr/local/src/tyuninstall/redis/redis.conf  /etc/redis/6379.conf
vim /etc/redis/6379.conf
bind 127.0.0.1 10.20.21.21
protected-mode no
daemonize yes
pidfile /var/run/redis_6379.pid
logfile /var/log/redis_6379.log
save ""
dir /etc/redis/
requirepass TYUN2020
maxmemory 16G
vim  /etc/init.d/redis
# chkconfig: 2345 10 90
# description: Start and Stop redisPATH=/usr/local/bin:/sbin:/usr/bin:/binREDISPORT=6379
EXEC=/etc/redis/bin/redis-server
REDIS_CLI=/etc/redis/bin/redis-cliPIDFILE=/var/run/redis_6379.pid
CONF="/etc/redis/6379.conf"case "$1" instart)if [ -f $PIDFILE ]thenecho "$PIDFILE exists, process is already running or crashed."elseecho "Starting Redis server..."$EXEC $CONFfiif [ "$?"="0" ]thenecho "Redis is running..."fi;;stop)if [ ! -f $PIDFILE ]thenecho "$PIDFILE exists, process is not running."elsePID=$(cat $PIDFILE)echo "Stopping..."$REDIS_CLI -p $REDISPORT -a TYUN2020 SHUTDOWNwhile [ -x $PIDFILE ]doecho "Waiting for Redis to shutdown..."sleep 1doneecho "Redis stopped"fi;;restart|force-reload)${0} stop${0} start;;*)echo "Usage: /etc/init.d/redis {start|stop|restart|force-reload}" >&2exit 1
esac
chmod 755 /etc/init.d/redis  #设置文件redis的权限
chkconfig redis on  #开启服务自启动
chkconfig --list   #查看所有注册的脚本文件
service redis start   #启动redis
service redis stop  #关闭redis
ps aux|grep redis  #查看redis进程
vim /etc/profile
export PATH=$PATH:$JAVA_HOME/bin:/etc/redis/binsource /etc/profile
redis连接测试redis-cli -h 10.20.21.21 -a TYUN2020
Elasticsearch
cd /usr/local/src/tiopspage/
tar -xf elasticsearch-6.8.12.tar.gz  -C  ./../tyuninstall/cd ./../tyuninstall/
mv elasticsearch-6.8.12  elasticsearchmkdir -p /tyun/elastic/{data,logs}
useradd elk
chown -Rf elk:elk  /tyun/elastic/
chown -Rf elk:elk  /usr/local/src/tyuninstall/elasticsearchvim /usr/local/src/tyuninstall/elasticsearch/config/jvm.options
-Xms16g
-Xmx16gMaster机器vim /usr/local/src/tyuninstall/elasticsearch/config/elasticsearch.yml
cluster.name: TYUN88        #集群名称
node.name: 10-20-21-21      #节点名称
path.data: /tyun/elastic/data        #索引数据存储位置
path.logs: /tyun/elastic/logs        #日志路径
network.host: 10.20.21.21  #当前es节点绑定的ip地址
http.port: 9200       #启动的es对外访问的http端口,默认9200
transport.tcp.compress: true    #设置是否压缩tcp传输时的数据
transport.tcp.port: 9300   #设置节点之间交互的tcp端口
node.master: true     #指定该节点是否有资格被选举成为node
node.data: true    #指定该节点是否存储索引数据
discovery.zen.ping.unicast.hosts: ["10.20.21.21","10.20.21.46"]    #设置集群中master节点的初始列表,可以通过这些节点来自动发现新加入集群的节点。
discovery.zen.minimum_master_nodes: 1 #设置这个参数来保证集群中的节点可以知道其它N个有master资格的节点。
http.cors.enabled: true #允许集群外的http请求
http.cors.allow-origin: "*"     # *号表示接收任意ip的http请求
http.cors.allow-headers: Authorization,X-Requested-With,Content-Length,Content-Type     #跨域允许设置的头信息
xpack.security.enabled: true #配置表示开启xpack认证机制
xpack.security.transport.ssl.enabled: trueSlave机器vim /usr/local/src/tyuninstall/elasticsearch/config/elasticsearch.yml
cluster.name: TYUN88
node.name: 10-20-21-46
path.data: /tyun/elastic/data
path.logs: /tyun/elastic/logs
bootstrap.memory_lock: true
network.host: 10.20.21.46
http.port: 9200
transport.tcp.compress: true
transport.tcp.port: 9300
node.master: false
node.data: true
discovery.zen.ping.unicast.hosts: ["10.20.21.21","10.20.21.46"]
discovery.zen.minimum_master_nodes: 1
http.cors.enabled: true
http.cors.allow-origin: "*"
http.cors.allow-headers: Authorization,X-Requested-With,Content-Length,Content-Type
xpack.security.enabled: true
xpack.security.transport.ssl.enabled: true
Elasticsearch启动脚本
切换到elk用户
vim /usr/local/src/tyuninstall/elasticsearch/TyunES.sh#!/bin/bash#extract ES pidid=`ps -elf | grep -i elasticsearch | grep 'Xmx' | awk '{print $4}'`if [ $# -eq 1 ];thencase $1 instart)if [ -z "$id" ];thenecho -e '\033[32mes starting....\033[0m'nohup su - elk -c "/usr/local/src/tyuninstall/elasticsearch/bin/elasticsearch" &  > /dev/nullsleep 5echo -e '\033[32mes started successfully\033[0m'
elseecho -e "\033[31mes Already started!,pid:${id}\033[0m"
fi
;;restart)if [ -z "$id" ];thenecho -e '\033[32mes restart....\033[0m'nohup su - elk -c "/usr/local/src/tyuninstall/elasticsearch/bin/elasticsearch" &  > /dev/nullsleep 5echo -e '\033[32mes restarted successfully\033[0m'elseecho -e '\033[32mes restart....\033[0m'kill -9 $id &> /dev/nullnohup su - elk  -c "/usr/local/src/tyuninstall/elasticsearch/bin/elasticsearch" &  > /dev/nullsleep 5echo -e '\033[32mes restarted successfully\033[0m'fi;;
status)if [ -z "$id" ];thenecho -e '\033[32mes Not started!\033[0m'elseecho -e "\033[32mes running,pid:${id}\033[0m"fi;;stop)if [ -z "$id" ];thenecho -e '\033[31mes Not started!\033[0m'elseecho -e '\033[32mes Stopping....\033[0m'kill -9 $id  &> /dev/nullsleep 2echo -e '\033[32mes stopped successfully\033[0m'
fi
;;*)echo -e '\033[31mstart|restart|status|stop\033[0m'esac
elseecho -e '\033[31mstart|restart|status|stop\033[0m'
fi
chmod +x /usr/local/src/tyuninstall/elasticsearch/TyunES.sh
/usr/local/src/tyuninstall/elasticsearch/TyunES.sh start   #启动Elasticsearch服务ss -tunl | grep -E '9200|9300'   #查看端口
Elasticsearch 账户密码登录
切换到elk用户/usr/local/src/tyuninstall/elasticsearch/bin/elasticsearch-setup-passwords auto
Please confirm that you would like to continue [y/N]yChanged password for user apm_system
PASSWORD apm_system = lYb3KJTp7h8AdDWWhf2gChanged password for user kibana
PASSWORD kibana = awkVszgqiyvfvHEynWHRChanged password for user logstash_system
PASSWORD logstash_system = kSypksQqLku0xzqojdTHChanged password for user beats_system
PASSWORD beats_system = cj7QYJV8Dhl97jjJjHV9Changed password for user remote_monitoring_user
PASSWORD remote_monitoring_user = vM3ikyjluHUFQGEN7EeoChanged password for user elastic
PASSWORD elastic = 5tVF53HD4TyqeLlflR0q`浏览器输入地址`  http://10.20.21.21:9200/   `或者是谷歌浏览器安装插件` ElasticSearch Head
Logstash
cd /usr/local/src/tiopspage/
tar -xf logstash-6.8.12.tar.gz  -C  ./../tyuninstall/   #解压文件cd ./../tyuninstall/
mv logstash-6.8.12  logstash
vim /usr/local/src/tyuninstall/logstash/config/logstash.yml
path.data: /tyun/logstash/data            #数据存储路径
path.logs: /tyun/logstash/logs   #日志输出路径
path.config: /usr/local/src/tyuninstall/logstash/conf.d/*.conf #配置文件目录
mkdir  -p /usr/local/src/tyuninstall/logstash/{conf.d,geoip}
mkdir -p /tyun/logstash/{data,logs}https://www.maxmind.com/en/account/login 注册一个账户便于下载地图文件
https://dev.maxmind.com/geoip/geoip2/geolite2/ `网站下载`GeoLite2-City.mmdb `文件`文件指引下载:输入地址使用账户密码登录后进入页面 Download Files模块找到GeoLite2 City 下载文件 GeoLite2-City_20200811.tar.gz把文件放到/usr/local/src/tyuninstall/logstash/geoip/下面解压cd /usr/local/src/tyuninstall/logstash/geoiptar -xf GeoLite2-City_20200811.tar.gzcp GeoLite2-City_20200811/GeoLite2-City.mmdb .rm -rf GeoLite2-City_20200811 GeoLite2-City_20200811.tar.gzll /usr/local/src/tyuninstall/logstash/geoip/GeoLite2-City.mmdb
Logstash启动脚本vim /usr/local/src/tyuninstall/logstash/logstash.sh
#!/bin/bash#extractlogstash pidid=`ps -elf | grep -i logstash | grep 'Xms' | awk '{print $4}'`
if [ $# -eq 1 ];thencase $1 instart)if [ -z "$id" ];thenecho -e '\033[32mlogstash starting....\033[0m'nohup sh /usr/local/src/tyuninstall/logstash/bin/logstash  &  > /dev/nullsleep 5echo -e '\033[32mlogstash started successfully\033[0m'
elseecho -e "\033[31mlogstash Already started!,pid:${id}\033[0m"
fi
;;restart)if [ -z "$id" ];thenecho -e '\033[32mlogstash restart.....\033[0m'nohup sh  /usr/local/src/tyuninstall/logstash/bin/logstash &  > /dev/nullsleep 5echo -e '\033[32mlogstash restarted successfully\033[0m'elseecho -e '\033[32mlogstash restart.....\033[0m'kill -9 $id &> /dev/nullnohup sh   /usr/local/src/tyuninstall/logstash/bin/logstash &  > /dev/nullsleep 5echo -e '\033[32mlogstash restarted successfully\033[0m'fi;;status)if [ -z "$id" ];thenecho -e '\033[32mlogstash  Not started!\033[0m'elseecho -e "\033[32mlogstash running,pid:${id}\033[0m"fi;;stop)if [ -z "$id" ];thenecho -e '\033[31mlogstash Not started!\033[0m'elseecho -e '\033[32mlogstash Stopping....\033[0m'kill -9 $id  &> /dev/nullsleep 2echo -e '\033[32mlogstash stopped successfully\033[0m'
fi
;;*)echo -e '\033[31mstart|restart|status|stop\033[0m'esac
elseecho -e '\033[31mstart|restart|status|stop\033[0m'
fi
chmod +x /usr/local/src/tyuninstall/logstash/logstash.sh
/usr/local/src/tyuninstall/logstash/logstash.sh  start      #启动Logstash服务如果发现启动失败的话 是因为 No config files found in path {:path=>"/usr/local/src/tyuninstall/logstash/conf.d/*.conf"}  下面还没有文件(把iis.conf放conf.d下面就可以启动成功)
ss -tunl | grep :9600
Kibana
cd /usr/local/src/tiopspage/
tar -xf kibana-6.8.12-linux-x86_64.tar.gz  -C  ./../tyuninstall/cd ./../tyuninstall/
mv kibana-6.8.12-linux-x86_64  kibana
vim /usr/local/src/tyuninstall/kibana/config/kibana.yml
elasticsearch.requestTimeout: 60000 #Elasticsearch后端响应请求的超时时间
elasticsearch.shardTimeout: 50000       #Elasticsearch等待分片响应的超时时间
server.port: 5601 #kibana服务端口
server.host: "10.20.21.21"      #kibana服务地址
server.name: "Kibana" #kibana服务名称
elasticsearch.hosts: ["http://10.20.21.21:9200"]    #查询的ES实例的url
elasticsearch.username: "elastic"
elasticsearch.password: "5tVF53HD4TyqeLlflR0q"
Kibana启动脚本vim /usr/local/src/tyuninstall/kibana/kibana.sh
#!/bin/bash#extract kibana pidid=`ps -elf | grep -i kibana | grep 'max-http-header-size' | awk '{print $4}'`
if [ $# -eq 1 ];thencase $1 instart)if [ -z "$id" ];thenecho -e '\033[32mkibana starting.....\033[0m'nohup sh  /usr/local/src/tyuninstall/kibana/bin/kibana  &  > /dev/nullsleep 5echo -e '\033[32mkibana started successfully\033[0m'
elseecho -e "\033[31mkibana Already started!,pid:${id}\033[0m"
fi
;;restart)if [ -z "$id" ];thenecho -e '\033[32mkibana restart....\033[0m'nohup  sh  /usr/local/src/tyuninstall/kibana/bin/kibana  &  > /dev/nullsleep 5echo -e '\033[32mkibana restarted successfully\033[0m'elseecho -e '\033[32mkibana restart....\033[0m'kill -9 $id &> /dev/nullnohup  sh  /usr/local/src/tyuninstall/kibana/bin/kibana  &  > /dev/nullsleep 5echo -e '\033[32mkibana restarted successfully\033[0m'fi;;status)if [ -z "$id" ];thenecho -e '\033[32mkibana Not started!\033[0m'elseecho -e "\033[32mkibana running,pid:${id}\033[0m"fi;;stop)if [ -z "$id" ];thenecho -e '\033[31mkibana Not started!\033[0m'elseecho -e '\033[32mkibana Stopping....\033[0m'kill -9 $id  &> /dev/nullsleep 2echo -e '\033[32mkibana stopped successfully\033[0m'
fi
;;*)echo -e '\033[31mstart|restart|status|stop\033[0m'esac
elseecho -e '\033[31mstart|restart|status|stop\033[0m'
fi
chmod +x /usr/local/src/tyuninstall/kibana/kibana.sh
/usr/local/src/tyuninstall/kibana/kibana.sh start     启动Kibana服务ss -tunl | grep -E '5601'
Filebeat
解压的文件安放的位置   C:\Program Files\
以管理员运行PowerShell
PS C:\Users\Administrator> cd 'C:\Program Files\Filebeat'
PS C:\Program Files\Filebeat>  .\install-service-filebeat.ps1
注:如果有报错的话 请在此目录下面执行命令来安装  set-ExecutionPolicy RemoteSigned
PS C:\Program Files\Winlogbeat> Start-Service filebeat查看服务的启动  services.msc 命令
编辑文件filebeat.ymlfilebeat.inputs:- type: logencoding: GB2312paths:- C:\inetpub\logs\LogFiles\*\*.logtags: ["iislog"]ignore_older: "72h"fields:list: iislog#fields_under_root: true output.redis:# Array of hosts to connect to.hosts: ["10.20.21.21:6379","10.20.21.46:6379"]db: 8password: "TYUN2020"key: "%{[fields.list]}"loadbalance: trueworker: 2#timeout: 5
grok 在线调试器,匹配日志字段
URL调式地址http://grokdebug.herokuapp.com/
IIS日志内容
2020-08-11 14:29:58 10.20.21.33 GET /Maintain.html - 8088 - 114.114.100.117 Mozilla/5.0+(Windows+NT+10.0;+Win64;+x64)+AppleWebKit/537.36+(KHTML,+like+Gecko)+Chrome/84.0.4147.125+Safari/537.36 200 0 0 536
Logstash收集IIS日志编写
vim /usr/local/src/tyuninstall/logstash/conf.d/iis.conf
input {redis {host => "10.20.21.21"port => "6379"key => "iislog"data_type => "list"type => "log"db => "8"password => "TYUN2020"threads => 1batch_count => 1}}filter{
if "iislog" in [tags]{
if [message] =~ "^#" {drop {}}grok {match => ["message", "%{TIMESTAMP_ISO8601:log_timestamp} %{IPORHOST:site} %{WORD:method} %{URIPATH:page} %{NOTSPACE:querystring} %{NUMBER:port} %{NOTSPACE:username} %{IPORHOST:clienthost} %{NOTSPACE:useragent} %{NUMBER:response} %{NUMBER:subresponse} %{NUMBER:scstatus} %{NUMBER:time_taken}"]}geoip{source=>"clienthost"target => "geoip"database => "/usr/local/src/tyuninstall/logstash/geoip/GeoLite2-City.mmdb"add_field => [ "[geoip][coordinates]", "%{[geoip][longitude]}" ]add_field => [ "[geoip][coordinates]", "%{[geoip][latitude]}"  ]}mutate {convert => [ "[geoip][coordinates]", "float"]}date{match => [ "log_timestamp", "yyyy-MM-dd HH:mm:ss" ]#timezone => "Asia/Shanghai"timezone => "+00:00"target => "@timestamp"}mutate {remove_field => ["log_timestamp"]}
ruby{code => "event.timestamp.time.localtime"}mutate {convert => {"port" => "integer""response" => "integer""time_taken" => "integer"}}
if [useragent] == "ChinaCache" {drop {}}
if [useragent] != "-" and [useragent] != ""{useragent{add_tag => "ua"source=>"useragent"}
if "ua" in [tags]{
if [device] == "iPhone" and [os] == "Other"{mutate {update => {"os" => "IOS""os_name" => "IOS"}}}
if [device] == "iPad" and [os] == "Other"{mutate{update =>{"os" => "IOS""os_name" => "IOS"}}}
if [os_name] == "iOS"{mutate{update =>{"os" => "IOS""os_name" => "IOS"}}}if [device] == "Spider"{mutate{update =>{"os" => "Windows""os_name" => "Windows"}}}
if [os_name] == "Other"{ mutate{remove_field => "os_name"}}
if [device] == "Other"{ mutate{remove_field => "device"}}
if [name] == "Other"{ mutate{remove_field => "name"}}
if [os] == "Other"{ mutate{remove_field => "os"}}
if [os] =~ "Android*" or  [os] =~ "IOS*"{mutate{add_field => { "platform" => "mobile"}}}else{mutate{add_field => { "platform" => "pc" }}}}}}}
output {if  "iislog" in [tags]{elasticsearch {hosts => "10.20.21.21:9200"user => "elastic"password => "5tVF53HD4TyqeLlflR0q5tVF53HD4TyqeLlflR0q"index => "logstash-%{+YYYY.MM.dd}"#manage_template => false#document_type => "iislog"}#stdout {codec => rubydebug}}}
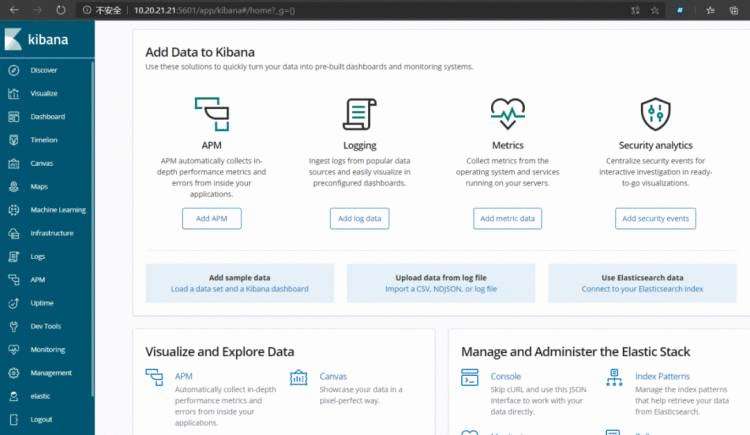
浏览器输入URL地址登录 http://10.20.21.21:5601
账户是:elastic 密码是:5tVF53HD4TyqeLlflR0q5tVF53HD4TyqeLlflR0q
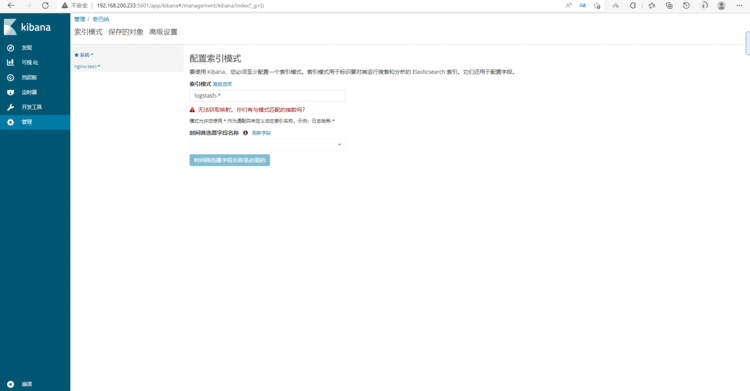
创建索引名称


通过Kibana展示出iis日志的数据信息

了解新钛云服
当IPFS遇见云服务|新钛云服与冰河分布式实验室达成战略协议
新钛云服正式获批工信部ISP/IDC(含互联网资源协作)牌照
深耕专业,矗立鳌头,新钛云服获千万Pre-A轮融资
新钛云服,打造最专业的Cloud MSP+,做企业业务和云之间的桥梁
新钛云服一周年,完成两轮融资,服务五十多家客户
上海某仓储物流电子商务公司混合云解决方案
新钛云服出品的部分精品技术干货
低代码开发,全民开发,淘汰职业程序员!
国内主流公有云VPC使用对比及总结
万字长文:云架构设计原则|附PDF下载
刚刚,OpenStack 第 19 个版本来了,附28项特性详细解读!
Ceph OSD故障排除|万字经验总结
七个用于Docker和Kubernetes防护的安全工具
运维人的终身成长,从清单管理开始|万字长文!
OpenStack与ZStack深度对比:架构、部署、计算存储与网络、运维监控等
什么是云原生?
IT混合云战略:是什么、为什么,如何构建?


 京公网安备 11010802041100号 | 京ICP备19059560号-4 | PHP1.CN 第一PHP社区 版权所有